If you are a fabricator, one of the last things on your list is ordering the gaskets. If you are an Engineer, the last thing on your list is specifying gaskets. If you are an owner and you hare having a problem sealing flanges, the number ONE thing on your mind is gaskets.
Many times, they look like a sheet of paper. They can have metal or graphite rings. They can be carbon steel or stainless steel. They can be big or small. But if you don’t have them, it is a tough life in the refinery, chemical plant or in the field.
The cost of leaky joints in industry today is staggering. Out-of-pocket costs run into billions of dollars annually in lost production, waste of energy, loss of product and, most recently, impact on the environment. These problems are increasing, not decreasing. It behooves all of us to consolidate our knowledge and experience to solve or at least minimize these problems. Too often we find insufficient time and attention has been given to:
- Proper design of flanged joint;
- Installation procedures; and,
- Selection of the optimum gasket material required to solve a particular sealing problem.
We will endeavor to outline those areas we believe to be essential in a properly designed, installed and maintained gasketed joint.
We believe most people involved with the design, installation, and maintenance of gasketed joints realize that no such thing as “zero” leakage can be achieved. Whether or not a joint is “tight” depends on the sophistication of the methods used to measure leakage. In certain applications the degree of leakage may be perfectly acceptable if one drop of water per minute is noted at the gasketed joint. Another requirement is that no bubbles would be observed if the gasketed joint was subjected to an air or gas test underwater. A still more stringent inspection would require passing a mass spectrometer test. The rigidity of any test method would be determined by:
- The hazard of the material being confined;
- Loss of critical materials in a process flow;
- Impact on the environment should a particular fluid escape into the atmosphere; and,
- Danger of fire or of personal injury.
All of these factors dictate proper attention must be given to:
- Design of flange joints or closures;
- Proper selection of gasket type;
- Proper gasket material; and,
- Proper installation procedures.
Care in these areas will ensure that the best technology and planning goes into the total package and will minimize operating costs, pollution of the environment and hazards to employees and the general public.
Why Gaskets are Used?
Gaskets are used to create a static seal between two stationary members of a mechanical assembly and to maintain that seal under operating conditions, which may vary dependent upon changes in pressures and temperatures. If it were possible to have perfectly mated flanges and if it were possible to maintain an intimate contact of these perfectly mated flanges throughout the extremes of operating conditions, a gasket would not be required.
This is virtually impossibility either because of:
- The size of the vessel and/or the flanges;
- The difficulty in maintaining such extremely smooth flange finishes during handling and assembly;
- Corrosion and erosion of the flange surface during operations; and,
- The sheer number of flanged joints in a typical industrial setting, and commercial implications.
As a consequence, relatively inexpensive gaskets are used to provide the sealing element in these mechanical assemblies. In most cases, the gasket provides a seal by utilizing external forces to flow the gasket material into the imperfections between the mating surfaces. It follows then that in a properly designed gasket closure, three major considerations must be taken into account in order for a satisfactory seal to be achieved.
- Sufficient force must be available to initially seat the gasket. Stated this way, adequate means must be provided to flow the gasket into the imperfections in the gasket seating surfaces.
- Sufficient forces must be available to maintain a residual stress on the gasket under operating conditions to ensure that the gasket will be in continuous intimate contact with the gasket seating surfaces to prevent leakage.
- The selection of the gasket material must be such that it will withstand the pressures exerted against the gasket, satisfactorily resist the entire temperature range to which the closure will be exposed and withstand corrosive attack of the confined medium.
Effecting a Seal
A seal is affected by compressing the gasket material and causing it to flow into the imperfections on the gasket seating surfaces so that intimate contact is made between the gasket and the seating surfaces.
There are four different methods that may be used either singly or in combination to achieve this unbroken barrier:
- Compression – This is the most common method of affecting a seal on a flange joint and the compression force is normally applied by bolting;
- Attrition – Is a combination of a dragging action combined with compression, such as in a spark plug gasket where the spark plug is turned down on a gasket that is both compressed and screwed in to the flange;
- Heat – An example is the case of sealing a ball and valve joint on cast iron pipe by means of molten lead. Molten lead is poured, then is tamped into place using a tamping tool and a hammer; and,
- Gasket Lip Expansion – This is a phenomenon that would occur due to edge swelling when the gasket would be affected by confined fluid. Elastomeric compounds affected by confined fluids, such as solvents, cause the gasket material to swell and increase the interaction of the gasket against the flange faces.

Generally, gaskets are called upon to affect a seal across the faces of contact with the flanges. Permeation of the media through the body of the gasket is also a possibility depending on material, confined media, and acceptable leakage rate.
Gasket Seating
There are two major factors to be considered with regard to gasket seating:
First, the gasket itself. The ASME Unfired Pressure Vessel Code Section VIII, Division 1 defines minimum design seating stresses for a variety of gasket types and materials. These design seating stresses range from zero psi for so-called self-sealing gasket types such as low durometer elastomers and O-rings to 26,000 psi (179 MPa) to properly seat solid flat metal gaskets. Between these two extremes there is a multitude of types and materials available to the designer enabling them to make a selection based upon the specific operating conditions under investigation.
Second, the other major factor to take into consideration must be the surface finish of the gasket seating surface. As a general rule, it is necessary to have a relatively rough gasket seating surface for elastomeric and PTFE gaskets on the order of magnitude of 500 micro inches. Solid metal gaskets normally require a surface finish not rougher than 63 micro inches. Semi-metallic gaskets, such as spiral wound gaskets, fall between these two general types. The reason for the difference is that with non-metallic gaskets such as rubber, there must be sufficient roughness on the gasket seating surfaces to bite into the gasket, thereby preventing excessive extrusion and increasing resistance to gasket blowout. In the case of solid metal gaskets, extremely high unit loads are required to flow the gasket into imperfections on the gasket seating surfaces. This requires that the gasket seating surfaces be as smooth as possible to ensure an effective seal. Spiral wound gaskets require some surface roughness to prevent excessive radial slippage of the gasket under compression. The characteristics of the type of gasket being used dictate the proper flange surface finish that must be taken into consideration by the flange designer, and there is no such thing as a single optimum gasket surface finish for all types of gaskets. The problem of the proper finish for gasket seating surface is further complicated by the type of the flange design. For example, a totally enclosed facing such as tongue and groove will permit the use of a much smoother gasket seating surface than can be tolerated with a raised face.
Flange Types
A flange is used to join pipe, valves, or a vessel within a system. The most common flanges used in industrial applications follow. When applying gasket and sealing components to these flanges, the user must take into consideration sizing limitations, available clamp load, optimum surface finish, and gasket placement to minimize flange rotation. Pressure ratings for ASME standard flanges are classified by pressure class of 150, 300, 400, 600, 900, 1500 and 2500. The most common terminology used is the pound reference, although the more formal reference is by class, such as class 150 flange. ASME requires that each flange be stamped with the manufacturer’s name, nominal pipe size, pressure classification, flange facing, bore, material designation, ring gasket number (when using a ring type joint flange facing) and heat number or code.
Raised Face Flange
Raised Face flanges are the most common type used in industrial applications due to their versatility in gasket compatibility, robust construction that prevents flange rotation under load and the unitized design.
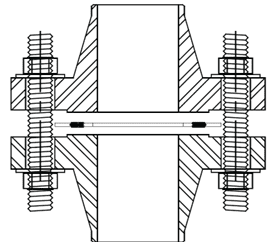
Flat Face Flange
Mating faces of both flanges are flat across the entire face both inside and outside the bolts. These unconfined gaskets require a mechanical stop to control compression height, such as a spiral wound gasket, should be designed with this consideration.

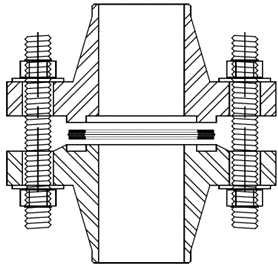
Tongue and Groove Flange
Compressibility characteristics of the confined design need to be taken into consideration when applying gaskets to this flange style to ensure flange surfaces do not meet and prevent over-compression on the gasket. The groove width is typically not wider than 1/16” (1.5 mm) over the tongue width to control gasket compression and creep relaxation due to gasket migration. The gasket dimensions will typically match the tongue dimensions.
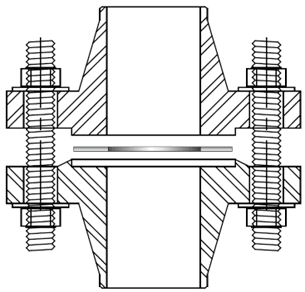
Male – Female or Recessed Groove Flange
Compressibility characteristics need to be taken into consideration when applying gaskets to this flange style to ensure flange surfaces do not meet and prevent over compression on the gasket.
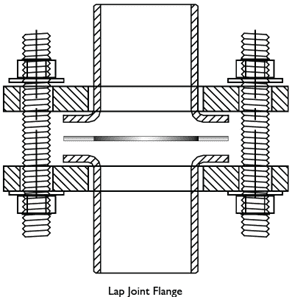
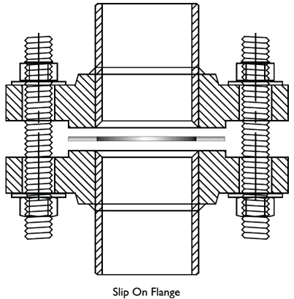
Lap Joint and Slip on Flange
A lap joint flange and slip on flange are very similar in that they are typically associated with non-critical applications and systems that require frequent dismantling for inspection. The slip on flange is bored slightly larger than the OD of the matching pipe. The pipe slips into the flange prior to welding both inside and outside to prevent leaks. The lap joint has a curved radius at the bore and face to accommodate a lap joint stub end.
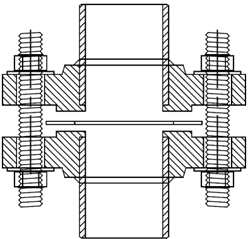
Socket Welding Flange
The flange is similar to the slip on flange, except it has a bore and a counter bore. The counter is slightly larger than the OD of matching pipe, allowing the pipe to be inserted. A restriction is built into the bottom of the bore, which acts as a shoulder for the pipe to rest on, and has the same ID of the matching pipe. The flow is not restricted in any direction.
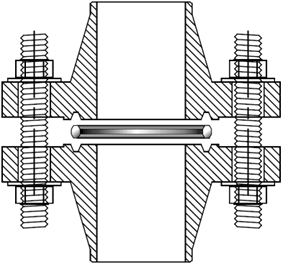
Ring Type Joint (RTJ)
Very often used for high pressure applications, ring type joints utilize octagonal or oval shaped ring gaskets that are ideally softer than the flange material. The gasket is confined in the joint, where surface finish is critical for the traditional metal to metal seal.
The Impact of Flange Finish on Gasket Performance
A critical and fundamental aspect of sealing is the level of friction between the flange and gasket surfaces. The level of roughness characteristic of the flange faces can have a dramatic effect on gasket creep relaxation, blow out resistance and bolted joint tightness. Dependent upon the type of gasket that is being used in the connection; different surface finishes can be utilized to optimize gasket performance.
As a general rule, metal gaskets and those that have less conformable surfaces require a very smooth surface finish. Given the creep resistance and structural stability of most metal gaskets, the two mating surfaces can create a very tight and reliable seal. Alignment, parallelism and flange finish must be within specified limits in order to achieve an optimal result. Metal gaskets such as solid metal and jacketed designs offer very little forgiveness in regards to flange finish, and bolting and assembly deficiencies. A typical surface finish recommendation for these types of metal contact seals is 64 AARH/RMS or smoother.
Soft gaskets such as compressed fiber sheet, that are more compressible, can be more forgiving in regards to alignment and parallelism of the flange. However, these designs are more susceptible to creep relaxation and movement while under a load. The flange surface finish can play a critical role in the gasket’s service life and long term reliability. A smooth surface finish will not create the necessary friction between these mating surfaces, allowing a non-reinforced gasket design to be more susceptible to creep under load. This creep would translate to a loss in bolted joint tightness and potential leakage. A rougher surface finish is generally recommended for soft, non-reinforced materials to create this necessary friction, which lends to stability and tightness between the mating surfaces. A typical surface finish recommendation for soft, non-reinforced materials is 125-250 AARH/RMS or rougher.
Flange Finish Definition and Common Terminology
Raised and flat flange facings are machined with serrations; serrations may be either phonographic or concentric. The industry standard is a phonographic serrated finish. The facing finish is judged by visual comparison with Roughness Average (Ra) standards. Ra is stated in microinches (μin) or micrometers (μm) and is shown as an Arithmetic Average Roughness Height (AARH) or Root Mean Square (RMS). AARH and RMS are different methods of calculation giving essentially the same result and are used interchangeably. The more common finishes are represented in the illustration below. Normally the manufacturer furnishes the “Stock Finish” unless the purchaser specifies otherwise.
Defined on following page, flanges are available in many different surface textures that can affect gasket performance.
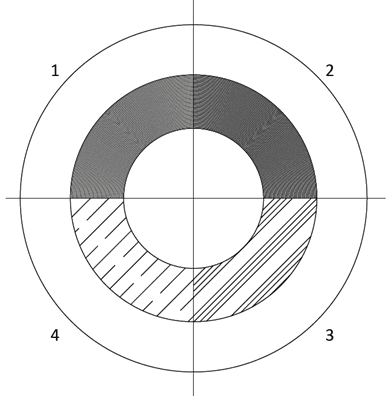
1. Stock Finish: This is a continuous spiral groove. Suitable for practically all ordinary service conditions, this is the most widely used of any gasket surface finish. The AARH/RMS microinch finish for this typically ranges from a 125 to 250 value. This finish is suitable for gaskets that have a soft conformable face. Under compression, the soft face will embed into this finish which helps create a seal. A high level of friction is generated between the mating surfaces due to this aspect. The stock finish for 12” (305 mm) and smaller flanges is generated by a 1/16” (1.59 mm) radius round nosed tool at a feed of 1/32” (0.79 mm) per revolution. For sizes above 12” (305 mm) the tool nose is 1/8” (3.17 mm) radius and the feed is 3/64” (1.19 mm) per revolution.
2. Spiral Serrated: This, too, is a continuous spiral groove but it differs from the stock finish in that the groove is generated using a 90 degree tool which creates a “V” geometry with 45 degree angled serration.
3. Concentric Serrated: (Not depicted) As the name suggests this finish is comprised of concentric grooves. A 90 degree tool is used and the serrations are spaced evenly across the face. This is a non-standard custom finish which must be specified.
4. Smooth Finish: This finish show no definite signs of tool markings apparent to the naked eye. These finishes are typically utilized for gaskets with metal facings such as double jacketed flat steel. The smooth surfaces mate to create a seal and depend on the flatness of the opposing faces to affect a seal. AARH/RMS Microinch finish values are typically better than a 64 value.
5. Lapped Finish (Cold Water Finish): Produced by using a wide tool at high speeds, this finish is equivalent to a ground surface. It is mirror like in appearance. Surfaces such as this are typically intended to be used without a gasket.
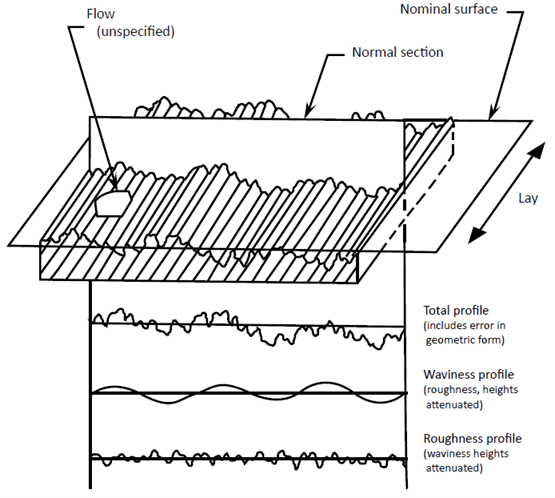
The concepts of surface roughness, waviness, and lay are illustrated schematically below.
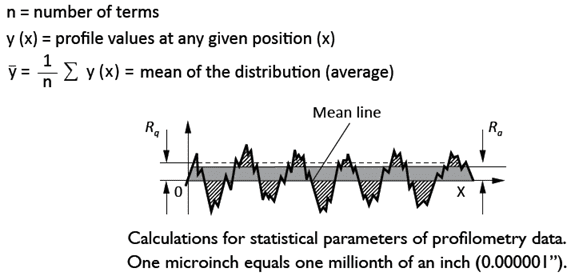
RMS microinch value is defined as the root mean square (square root of the mean square) of an infinite series of distances measured in microinches from the hypothetical nominal or mean surface line to the actual irregular surface contour. For all practical purposes, the RMS microinch value is a weighted average unit of surface roughness that is affected to a greater extent by the highest and lowest deviation from the nominal surface that is by the minor deviation. AARH is calculated by obtaining the average roughness height of the irregular surface.
Mean Roughness
Arithmetical mean deviation (Ra) is a statistical measure of the variance from an average roughness profile values.

Root-mean-square deviation (Rq) is a statistical measure of the roughness profile values of a varying quantity.

Material Considerations
A most important factor in selecting the proper gasket is selecting the suitable material that will be compatible with the application service.
The optimum gasket material would have the following characteristics:
- It would have the chemical resistance of PTFE;
- The heat resistance of Flexible Graphite;
- The strength of steel;
- It requires a zero seating stress, such as with soft rubber; and,
- Be cost effective.
Obviously there is no known gasket material that has all these characteristics, and each material has certain limitations that restrict its use. It is possible to overcome limitations partially by several methods such as:
- Including the use of reinforcing inserts;
- Utilizing combination of materials;
- Varying the construction and/or density; and,
- Designing the joint itself to overcome some of the limitations.
Evidently, mechanical factors are important in the design of the joint but the primary selection of a gasket material is influenced by different factors:
- The temperature of the fluid or gas in the service Gaskets are affected in two ways by temperature. Gross physical characteristics are determined by temperature, including material state, oxidation point, and resilience. Also the mechanical (creep or stress relaxation) and chemical properties are highly temperature dependent.
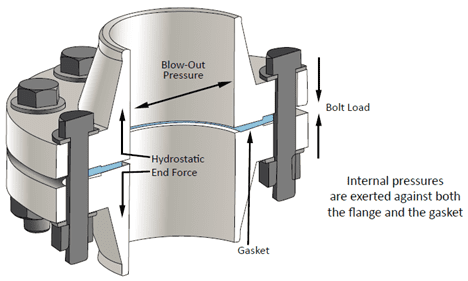
- The pressure of the fluid or gas in the service. Internal pressure acts in two ways against a gasket. First, the hydrostatic end force, equal to the pressure multiplied by the area of pressure boundary, tends to separate the flanges. This force must be opposed by the flange clamp force. The difference between the initial flange clamp force and the hydrostatic end force is residual flange load. The residual load must be positive to prevent joint leakage. The magnitude of the residual flange load required to prevent leakage is dependent upon the style of gasket selected and its material of construction. Second, the internal pressure acts to blow out the gasket across the gasket flange interface.
- The corrosive characteristics of the fluid or gas to be contained The gasket must be resistant to deterioration from corrosive attack. The severity of attack and resulting corrosion is dependent upon temperature and time.
4. Flange Compatibility The gasket is intended to be the renewable component in the joint system therefore it should be softer or more deformable than the mating surfaces. It must also be chemically compatible. For metallic gaskets, this means consideration must be given to galvanic corrosion. Galvanic effects can be minimized by selecting metals for the gasket and flange which are close together in the galvanic series, or the gasket should be sacrificial (anodic) to prevent damage to the flanges.
Summary
There are charts that are included in the appendix that shows the maximum temperature limits for non-metal and metal materials. The ratings are based upon hot air constant temperatures. The presence of contaminating fluids and cyclic conditions may drastically affect the temperature range. Also, there are charts that indicate general recommendations for non-metallic and metallic materials against various corrosive media. These charts are general references, as there are many additional factors that can influence the corrosion resistance of a particular material at operating conditions. Some of these factors include:
- Concentration of the corrosive agent (full strength solutions are not necessarily more corrosive than those of dilute proportions and the opposite is also true);
- The purity of a corrosive agent. For example, dissolved oxygen in otherwise pure water may cause rapid oxidation of steam generation equipment at high temperatures; and,
- The temperature of the corrosive agent. In general, higher temperatures of corrosive agents will accelerate corrosive attack.
As a consequence, it is often necessary to “field-test” materials for resistance to corrosion under normal operating conditions to determine if the material selected will have the required resistance to corrosion.
In the next installment we will discuss gasket selection to use with the previously discussed flanges.
References: (1) ASME Section VIII Division1 Code – 2015 Edition
This is presented to you as a service from BOARDMAN, LLC located in Oklahoma City, Oklahoma.
Since 1910, Boardman has been a respected custom fabricator. We take pride in our ability to take the most stringent specifications and requirements to provide a high quality solution to our customers. With more than 75 years of ASME Section VIII, Division I engineering experience, we have the unique ability to provide custom solutions to our customers.
