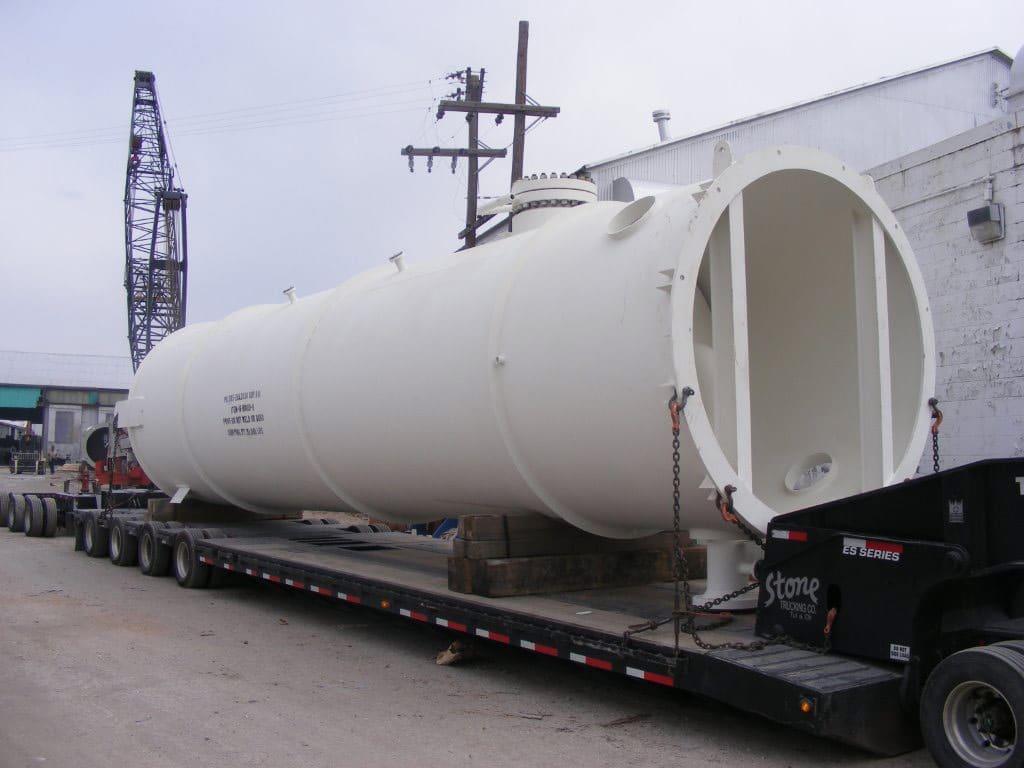
Understanding what is required for boiler and pressure-vessel manufacturers can help scheduling and cost assessments
Material Requirements
Materials of construction for the vessel delivered to the manufacturer must be inspected to verify compliance with the Code. For plates, the manufacturer shall verify that the slab number, heat number and material grade marked on the plate match what is shown on the material test report (MTR) provided by the supplier (Figures 4 and 5).

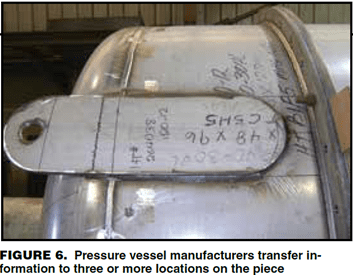
Like the plate, the manufacturer shall verify that the heat number and material grade marked on the pipe match what is provided on the MTR. During the receiving and inspection process, some manufacturers will transfer the job number, heat number and material grade to three or more locations on the pipe and plate with the intention of helping the shop transfer these numbers once material starts to be formed, cut and removed (Figure 6).
Transferring these numbers is to ensure the manufacturer is in accordance with UG-77 of the Code, which requires traceability on all material to the original identifying markings. For carbon steel, the markings are made with a white or yellow paint marker. For stainless steel, markings are typically made with a black permanent marker. For manufactured components purchased from another manufacturer, (that is, vessel heads), the vessel manufacturer must dimensionally check vessel heads to the prescribed dimensional tolerances and verify that the head meets the minimal thickness required by the calculations, as outlined per UG-96 of the Code. Most manufacturers will not begin rolling shell plate for vessels that incorporate cold-formed heads until the heads have arrived at the manufacturer’s facility and the dimensions are confirmed.
Per UG-81 of the Code, the heads cannot deviate in nominal outside dimensions by more than 1.25%, and no more than 0.625% for inside dimensions. The nominal diameter of the head will govern the final dimensions when the shell plates are rolled. Accurately made templates are to be made for verification of the head geometry.
It is important for the user to understand that the thickness verification of a torispherical or ellipsoidal head should be performed at the knuckle regions and the top-center of the head where the product will thin the most during cold-forming.
Most shops own an ultrasonic testing (UT) instrument used to measure alloy thicknesses. Gage thickness testing on the straight flange of a vessel head is not preferred. Parts manufactured at a location other than the manufacturer of the vessel, such as elliptical handholes or T-bolt closures, shall be provided with a Manufacturer’s Partial Data Report Form U-2 or U-2A. The parts manufacturer and its affiliated AI will validate that the part is in accordance with the Code. For manufactured Code parts, some manufacturers will write the job number and material grade on the part to minimize error. For flanges, the product will have the material grade and compliance with ASME B16.1 stamped on the outer edge of the flange.
The manufacturer will inspect the flanges for defects, such as scratches or damage to serrated raised faces. All plate and pipe form, along with flanges and fittings, should be located in a designated area separate from non-Code materials. The details of how this material is stored, identified and inspected, along with the generation of the receiving reports, are outlined in the manufacturer’s quality control manual.
As material is received, the quality control manager is responsible for verifying that the supplier’s MTR is in accordance with the Code. The MTR will be checked for proper identification of material with the proper Code specification of ferrous or nonferrous metal, and so on. For example, stainless plate is designated by ASTM International (www. astm.org) as A240-316L, whereas the Code will require the designation of SA240-316L. When referencing the ASME BPV Code, Section II, Parts A and B, the materials accepted by the Code will be identified as equivalent to the ASTM standard where applicable. Therefore, when reviewing the manufacturer’s shop drawings, the user should note that all material specified on the drawing bears the ASME designation and not the designations of ASTM.
The quality control manager will crosscheck the percentage of constituents in each alloy on the MTR with those provided by ASME, Section II, Parts A and B. If the material for use with the vessel is within the allowable limits of the Code, the MTR will be filed and the traveler will be initialed and dated by the quality control manager. For some manufacturers, the MTRs are initialed and dated by the quality control manager the day they are reviewed and the material is received. The Code does not specify at what point the material test reports must be verified with the requirements of Section II. This is clarified in the Code interpretation VIII-1-86-129.
If the material supplied is found to have defects, or an MTR indicates its chemical composition does not meet the requirements of the Code, the manufacturer will generate a non-conformance report and place a non-conformance “hold” tag on the material in question. The manufacturer’s quality control manual will list the procedures to be carried out and the persons within the organization who are involved with.
The quality control manual should address whether or not the tack welds will be incorporated into the weld of the vessel or if they will be ground out once the root pass has been started.
In addition, the quality program verifies that all material grades and heat numbers have been transferred from the stock material to each individual pressure-retaining component. This includes all pipe and tube material, as clarified in Code interpretation VIII-1-98-44. The Code does not require the transfer of material markings to nonpressure-retaining parts, such as lift lugs, legs, support skirts and so on, per Code interpretation VIII-1-92-89. However, it is not uncommon for most shops to transfer marking to non-pressure-retaining items in order to maintain consistency on the shop floor. The quality control manager will coordinate with the shop foreman to determine which welders will be assigned to the vessel during fabrication.
Welding requirements
The quality control manager is responsible for verifying that each welder is qualified for the procedures listed on the fabrication drawings, and that each welder has performed these operations within six months prior to welding on the vessel. If the welder has not met the six-month requirement, or if the parameters of a qualified weld procedure have changed, then his or her qualifications have expired and he or she must be tested and requalified, as outlined in Section IX, QW-322 of the Code. The manufacturer’s quality control manual will outline the procedure for certifying a welder’s qualification. It is important to understand that the Code does not certify welders, or guarantee that the welders meet the standard. Only the manufacturer can qualify a welder as being competent in meeting the requirements of the weld procedure developed within the manufacturer’s organization.
The quality control manual must outline the handling of all welding consumables. All filler metals should be stored in a dry area and signed out through a designated person(s). Low-hydrogen coated electrodes should be stored in “hot boxes” or rod ovens and quantities issued to the welder(s) should be sufficient to complete a weld or for the duration of a shift, whichever is less. The low-hydrogen coated electrodes will absorb moisture, and over time, the moisture will affect the quality of the electrode.
Throughout fabrication, the manufacturer’s quality control manager will perform a visual inspection of the welds to ensure they meet the requirements of the Code and good manufacturing practices. Welding undercut, gouges in the base metal or other quality-related issues must be documented as nonconformance items and resolved within the manufacturer’s organization.
Non-destructive examination
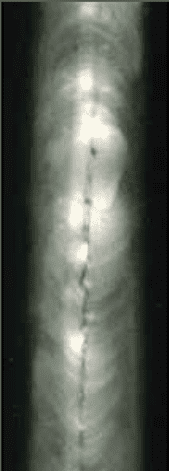
The basis of design will determine the level of non-destructive examination (NDE) required. Although the outer appearance of a weld might look acceptable, the weld could contain excessive porosity, lack of fusion, undercutting or cracks (Figure 7). The quality control manager will review the NDE reports and verify that they meet the needs of Section V of the Code. When reviewing NDE reports, the quality control manager will confirm that the NDE personnel are qualified in accordance with SNTTC-1A (guidelines from the American Society for Nondestructive Testing for employer-based certification of testing personnel). Once the NDE is completed and the reports submitted, the quality control manager will initial and date the traveler.
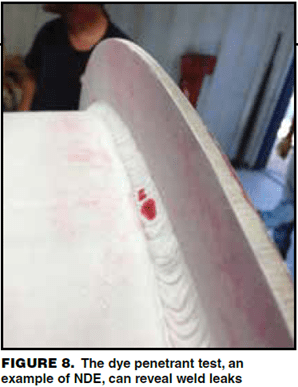
Most manufacturers perform their own NDE inspections, such as dye-penetrant examination (Figure 8). However, the manufacturer must meet the requirements of Section V, which include a written procedure on how the NDE will be performed, a test plate to qualify shop personnel, and a record of the yearly eye exams for qualified persons.
With regard to interpreting radiography, the manufacturer shall have a qualified NDE contractor with personnel who meet the requirements of SNT-TC-1A. An AI may be fully qualified in accordance with SNT-TC-1A but cannot be the only qualified individual to interpret the radiographs as outlined in interpretation VIII-1-86-19. However, an AI does have the authority to reject radiographs, for legitimate reasons, that have been interpreted and accepted by a Level II or Level III radiographer. As stated in interpretation VIII-1-86-42, the AI is not required to review all radiographs, but must review a sufficient number of radiographs to verify the examination was performed and the results were acceptable per the Code. The Code does not require a specific percentage of radiographs required to be reviewed by the AI.
Report forms
Near the completion of the vessel, the manufacturer will generate a Manufacturer’s Data Report Form U-1 or Form U-1A. Any effort to complete necessary paperwork before the final inspection and hydrostatic test will help reduce the time and cost associated with the AI.
The manufacturer’s quality control system should provide procedures explaining the development, control, retention and distribution of the data reports. Form U-1 is a two-page report allowing data entry for more sophisticated vessels, such as heat exchangers with multiple chambers, tubesheets and tube sections. Form U-1A is an alternative one-page report for single-chamber vessels fabricated entirely in a shop or in the field. The manufacturer can increase the number of lines on the data report to describe additional shell courses or nozzles.
The format of the data report as shown in Appendix W of the Code is nonmandatory and can be altered in appearance. However, the data report must address all information on the sample data report provided in Appendix W. If the data report exceeds one page, there must be sufficient space on each additional page for the manufacturer and the AI to initial and date it.
If the manufacturer needs additional room to provide detailed information for the vessel or its components, Form U-4 can be submitted with Form U-1/ U-1A. Form U-4 is the manufacturer’s supplementary data sheet that provides additional space for remarks.
Reduced sketches and drawings can be added. If the user desires to have a small image showing the configuration of the vessel, it can be added to Form U-4 and filed with Form U-1 / U-1A. If the vessel is registered with the National Board, the manufacturer’s data reports are the only items filed. Shop drawings are not included with the registration. It is the responsibility of the user to request reduced sketches and vessel configuration drawings added to Form U-4 when the purchase order is generated. Manufacturers of vessels will not go to extended lengths to provide more information than what is required by the Code.
During final inspection, the AI should review the shop drawings to check for revisions made since the initial review and make a last review of the calculations, if necessary.
The traveler will also be reviewed. There should be a chronological order of inspections that have taken place since the inception of the package included on the traveler. The AI will review the material test reports (MTRs) and the material inspection reports for the construction material used on the vessel. The AI will also confirm that the MTRs were reviewed by the manufacturer’s quality control program, and that the material was delivered in acceptable condition. Next, the weld map will be reviewed to verify that there were inspections for fit-up and the manufacturer’s welders were identified for each component on the vessel.
Depending on the AI’s level of confidence with the manufacturer, he or she may select a welder from the weld map and request to see the welder’s performance qualification.
Welds are inspected externally for indications of excessive reinforcement, signs of improper start-stops or undercut. Fillet welds may be inspected for proper size on nozzles and lug attachments. The detailed placement of nozzles on the vessel head and shell are not the responsibility of the AI; they are the responsibility of the manufacturer as part of good manufacturing practices.
Post-Fabrication
A standard hydrostatic test, for ensuring the strength of the vessel and checking for leaks, can only be conducted once the fabrication of the pressure vessel has been completed and all NDE performed. Some operations, such as cosmetic grinding to remove weld spatter, are permitted after the test. The hydrostatic test shall be in accordance with UG-99 of the Code, where every pressure-retaining item in the vessel will be subjected to at least 1.3 times the maximum-allowable working pressure marked on the vessel nameplate. The Code further clarifies that the lowest ratio of the stress value at test temperature to the stress value at design temperature shall be multiplied by 1.3 and the maximum-allowable working pressure.
During the hydrostatic test, the AI will perform a visual examination of the vessel, looking for leaks and a drop in pressure. Test times can be 15 min or longer, depending on the size and complexity of the vessel. Test gages will consist of an indicating gage connected directly to the vessel, along with a master gage. Per Code interpretation VIII-1-89-207R, the indicating gage does not have to be mounted directly on the vessel, but should be directly connected to the vessel with no intermediate valves.
In addition, the gage is not required to be connected at the highest point on the vessel. Both gages should range greater than 1.5 times, but not more than 4 times the hydrostatic pressure. Both gages should provide the same reading and be calibrated against a deadweight tester or master gage. The manufacturer’s quality control manual should provide a detailed explanation of how often these gages are calibrated and how the calibration records are filed. Only after the hydrostatic test has been performed can the vessel nameplate be stamped and attached to the vessel.
Vessel nameplates
Vessel nameplates are typically attached to a bracket that protrudes at least 4–6 in. off the vessel wall to prevent cover up by insulation. The preferred practice is to install the nameplate over an inspection nozzle or manway, as recommended in UG-116(i) of the Code. The AI must witness the stamping of the nameplate and the attachment of the nameplate to the vessel. Once the attachment of the nameplate has been witnessed, the AI and the quality control manager will initial and date the traveler, indicating that the vessel is complete.
Upon application of the vessel nameplate, the AI and quality control manager will review the Manufacturer’s Data Report Form U-1/U-1A for validity, omissions and errors. Once the data report is complete, the AI will provide his National Board Commission number, and will sign and date the document. The quality control manager will also sign and date the document and start the filing process. The Code does not address the timeframe in which the manufacturer’s data report must be signed. It is the responsibility of the manufacturer to apply the nameplate and see that the manufacturer’s data report is signed by the AI.
The manufacturer is required to furnish a copy of the manufacturer’s data report to the user and submit a copy to the local jurisdiction where the vessel is installed and the Code enforced. The manufacturer is required to keep a copy of the manufacturer’s data report on file for a minimum of five years if the manufacturer does not file the vessel with the National Board of Boiler & Pressure Vessel Inspectors, as mandated in UG-120(4).
It is suggested that the user require the vessel to be registered with the National Board of Boiler & Pressure Vessel Inspectors.
Repairs and alterations
For repairs and alterations of pressure vessels, the manufacturer is still required to maintain the quality control plan outlined within the organization. However, the manufacturer must have a National Board “R” Certificate of Authorization, since the manufacturer’s “U” Certificate of Authorization for new construction does not permit repairs and alterations. The requirements for repairs and alterations are outlined in the National Board Inspection Code (NBIC).
For repairs and alterations, the manufacturer shall determine the construction standard by which the vessel was originally fabricated. This could be an earlier edition and addenda to Section VIII, Division I, or the vessel could have been fabricated under another division of the Code. Second, the manufacturer shall determine the material of construction of the vessel. The material of construction will determine which qualified weld procedures and qualified welders can be used on the project, and the level of NDE. Also, the material will determine if post-weld heat treatment or stress relieving is required. Third, the manufacturer needs supporting documentation which provides evidence that the vessel under repair or alteration was indeed fabricated in accordance with the original Code. The ideal situation is to obtain a rubbing of the vessel nameplate and confirm that it matches the original manufacturer’s data report U-1 or U-1A.
The manufacturer’s data report will provide the design conditions, material of construction, nominal plate and pipe thickness, and degree of NDE. If the nameplate is legible on the vessel, but the manufacturer’s data report is not on file with the owner, then a copy of the manufacturer’s data report can be obtained through the National Board. The NB will require the following information from the vessel nameplate: the manufacturer’s name, NB number, serial number and date of manufacture. Data reports can be sent electronically, or via postal service or courier.
Source: Pressure-Vessel Quality Control Requirements, Keith Kachelhofer, Hargrove Engineers + Constructors. Chemical Engineering, January 1, 2014
This is presented to you as a service from BOARDMAN, LLC located in Oklahoma City, Oklahoma.
Since 1910, Boardman has been a respected custom fabricator. We take pride in our ability to take the most stringent specifications and requirements to provide a high quality solution to our customers. With more than 75 years of ASME Section VIII, Division I engineering experience, we have the unique ability to provide custom solutions to our customers.
The sizes of these projects are up to 200’ in length, 350 tons, 16’ diameter and 4” thick.
